Master Keys Upgrade Instructions
Step 1: Download the Installer.
Apple Silicon or Intel – 64 Bit – Standalone, AAX Native, AU, VST2, VST3
Step 2: After accepting the terms, you will be taken to the format selection page. If you have not yet installed Master Keys, you need to select “Plugin” to install the plugin.

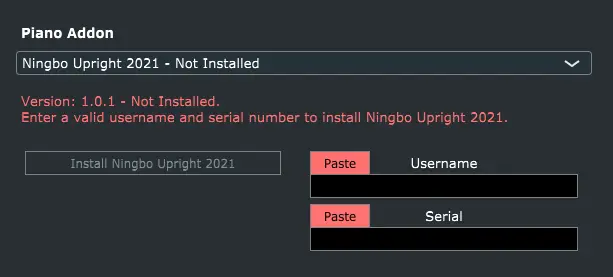
If you do not have any pianos installed, select a piano to install from the “Piano Addon” dropdown. Enter your username and serial number as found in your downloads page. If you purchased any of the pianos from www.bozdigitallabs.com, you can use the username and serial on that downloads page as well (It should be the same).
Note that you cannot install any of the “Pro” pianos without registering first. You may, however, install any of the “Lite” pianos without registering. They will install, but run in “Demo” mode. You can always register them later from the plugin.

Step 3: If you are installing a piano, select where you want the piano data and samples stored. Note that you should choose a hard drive that has plenty of space, as the samples can take a few GB of space for the “Pro” pianos. It is also important to choose a solid state drive to avoid pops/clicks during playback.
Also note that if you have any of the older New York L pianos installed, you need to choose a different folder to save the samples in order to avoid conflicts with both plugins.
Step 4: Confirm Installation files
Step 5: The installer will now download and install all the files it needs to run. If you selected “Plugin” on step 2, It will download and run a package installer. Follow the instructions in there to install the plugin.
If you are installing a “Pro” piano or you have a slow connection, this could take a couple of minutes. When it is complete, your plugin and piano is installed.
Step 6: If you want to install more piano addons, just run the installer again. You can skip step 2 and just select which piano addon you want to install.
Step 1: Download the Installer.
Windows 7 or greater – 64 Bit – Standalone, AAX Native, VST2, VST3
Step 2: After accepting the terms, you will be taken to the format selection page. If you have not yet installed Master Keys, you need to select which format of the plugin you want to install (Standalone, AAX, VST2 or VST3).

If you do not have any pianos installed, select a piano to install from the “Piano Addon” dropdown. Enter your username and serial number as found in your downloads page. If you purchased any of the pianos from www.bozdigitallabs.com, you can use the username and serial on that downloads page as well (It should be the same).
Note that you cannot install any of the “Pro” pianos without registering first. You may, however, install any of the “Lite” pianos without registering. They will install, but run in “Demo” mode. You can always register them later from the plugin.

Step 3: If you selected “VST 2” as one of your formats, choose a folder where you want to save the Master Keys VST2 plugin. You can choose any location that your DAW will scan. This file is only about 10MB large, so you are fine storing this on your system drive. This is not the location where your samples will be stored.
Step 4: If you are installing a piano, select where you want the piano data and samples stored. Note that you should choose a hard drive that has plenty of space, as the samples can take a few GB of space for the “Pro” pianos. It is also important to choose a solid state drive to avoid pops/clicks during playback.
Also note that if you have any of the older New York L pianos installed, you need to choose a different folder to save the samples in order to avoid conflicts with both plugins.
Step 5: Confirm Installation files
Step 6: The installer will now download and install all the files it needs to run. If you are installing a “Pro” piano or you have a slow connection, this could take a couple of minutes. When it is complete, your plugin and piano is installed.
Step 7: If you want to install more piano addons, just run the installer again. You can skip step 2 and just select which piano addon you want to install.
Do I have to pay for this upgrade if I already own the New York L pianos?
No. The upgrade is free. All the pianos you own can be migrated to Master Keys. You can use the same serial number to register your piano in Master Keys.
Can I keep my old New York L pianos installed if I update to Master Keys?
Yes, you can have your original pianos installed while installing Master Keys.
Important! The samples for Master Keys have been modified from the original New York L samples, so you will have to install Master Keys samples into a different folder to avoid conflicts between Master Keys and the original samples.
Do I have to make a new account on this site to get my upgrade?
You shouldn’t have to. We are working on migrating all the accounts over to this site so that you don’t have to make a new account here. You should be able to log in with your Boz Digital Labs username, however for security reasons, you will need to make a new password.
What’s new in Master Keys?
- All pianos are now in a single plugin. You can now switch pianos from a drop down menu.
- Improved sound (especially with New York L 1991).
- Simpler and more adjustable Resonance Samples.
- Sustain control.
- More efficient sound engine reducing pops/clicks.
- 2 new pianos (Lite and Pro versions available for each).
- Demo available for all Lite versions of pianos.
